Khoury College of Computer Sciences
CS 4550 / CS 5610 · Web Development · Fall 2026
Kambaz Pazza
Final Project Requirements
Introduction
In this Web development course, your final project will culminate in an exciting challenge: creating Pazza, a clone of a popular Q&A platform of a similar name. Pazza will be integrated directly into the ongoing Kambaz project you've been developing throughout the semester. This project will test your skills in the MERN stack - MongoDB, Express.js, React, and Node.js - providing you with practical experience in merging new functionalities into existing systems. You'll need to replicate Pazza's core features such as posting questions, answering, and categorizing discussions, all while ensuring seamless integration with your current codebase. This task will enhance your ability to manage larger codebases, practice full-stack development, and understand the complexities of feature integration in a live, evolving project. Let's dive in and transform your semester-long project into a more interactive and community-driven platform!
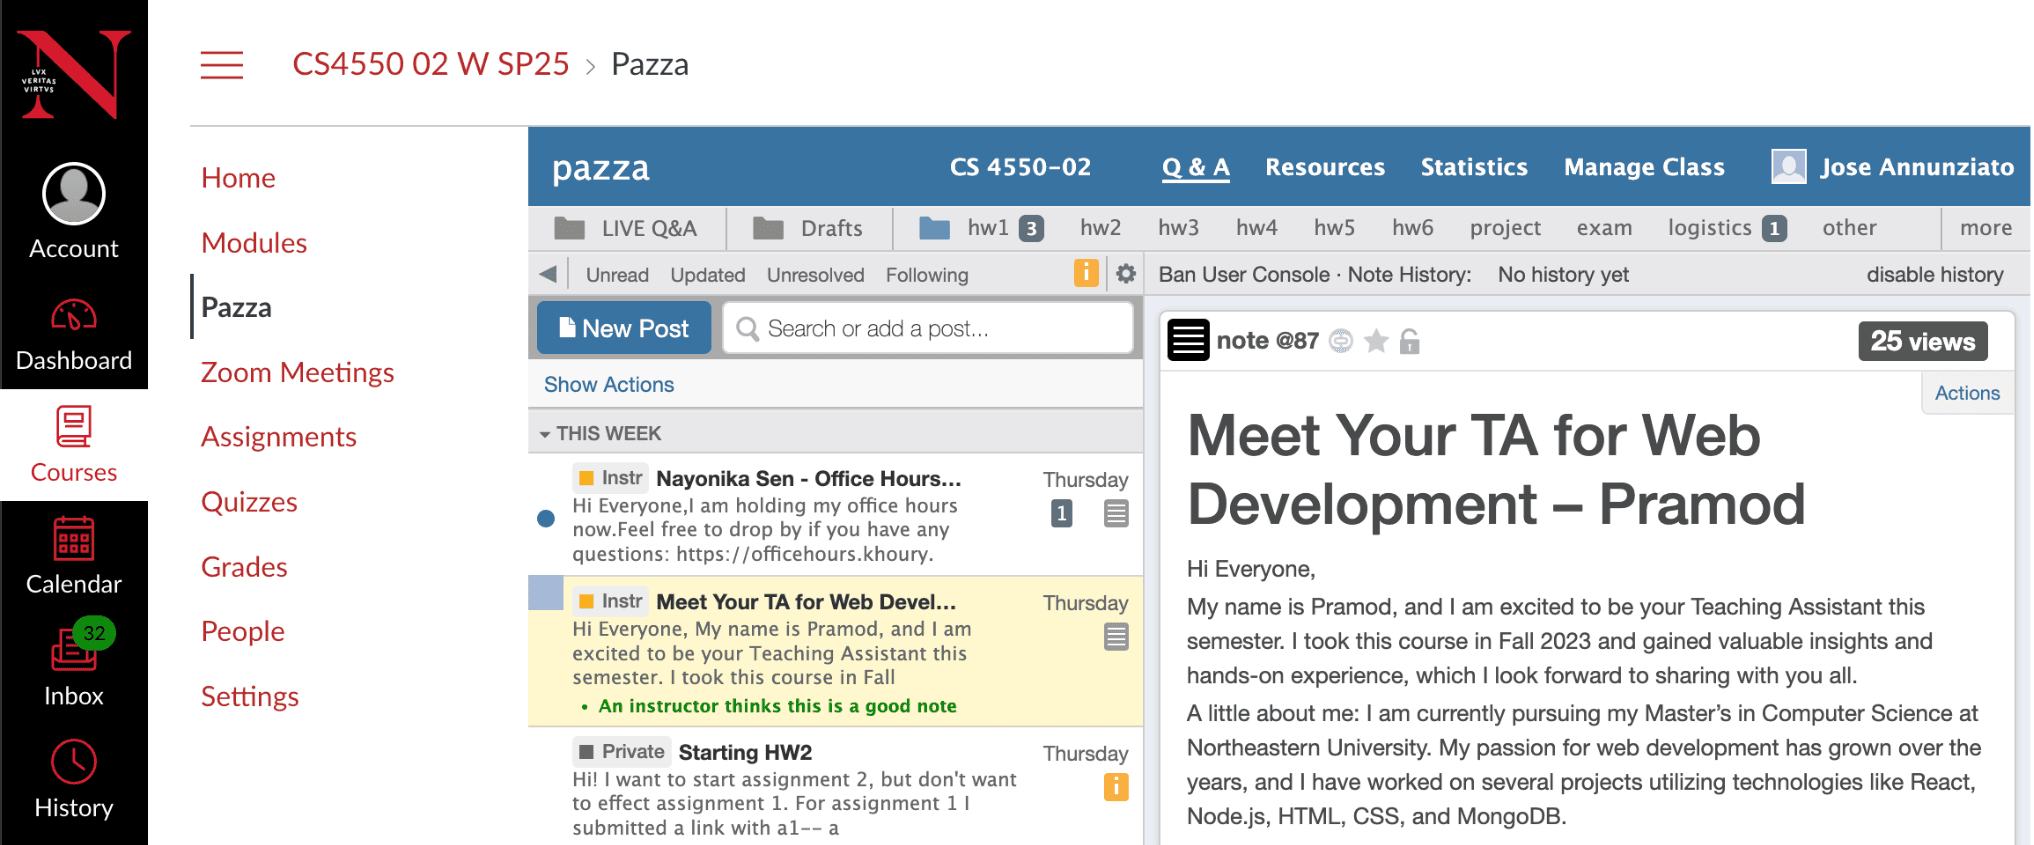
The screenshot below illustrates Pazza embedded in Kambaz. Clicking Pazza in the Courses Navigation sidebar displays Pazza on the right hand side. Each course has its own separate instance of Pazza with its own set of posts, questions, and answers. In its header at the top, Pazza displays the name of the current course and the name of the currently logged in user.
Questions and Answers Screen (Q&AS)
Let's delve into the specifics of the Questions and Answers Screen (Q&AS) for our Pazza project, which forms a crucial part of your final web development assignment. When you click on Pazza in the Courses Navigation Sidebar (CNS), the Q&AS is immediately revealed, serving as the default screen for Pazza. This screen is designed to facilitate interaction and learning by allowing users to post queries, contribute answers, and engage in discussions. Here's what you need to know about its structure: At the top of all screens within Pazza, there's a fixed Pazza Navigation Bar (PNB), which remains stationary as you scroll through the content, ensuring that navigation controls are always accessible. This bar includes several key elements essential for navigating and interacting with the platform. Let's explore these components and the layout of the Q&AS to understand how they integrate to enhance user experience.
- When you click Pazza in the Courses Navigation Sidebar (CNS), the Questions and Answers Screen (Q&AS) is revealed, as shown below
- The Q&AS is the default screen when Pazza is clicked in the CNS
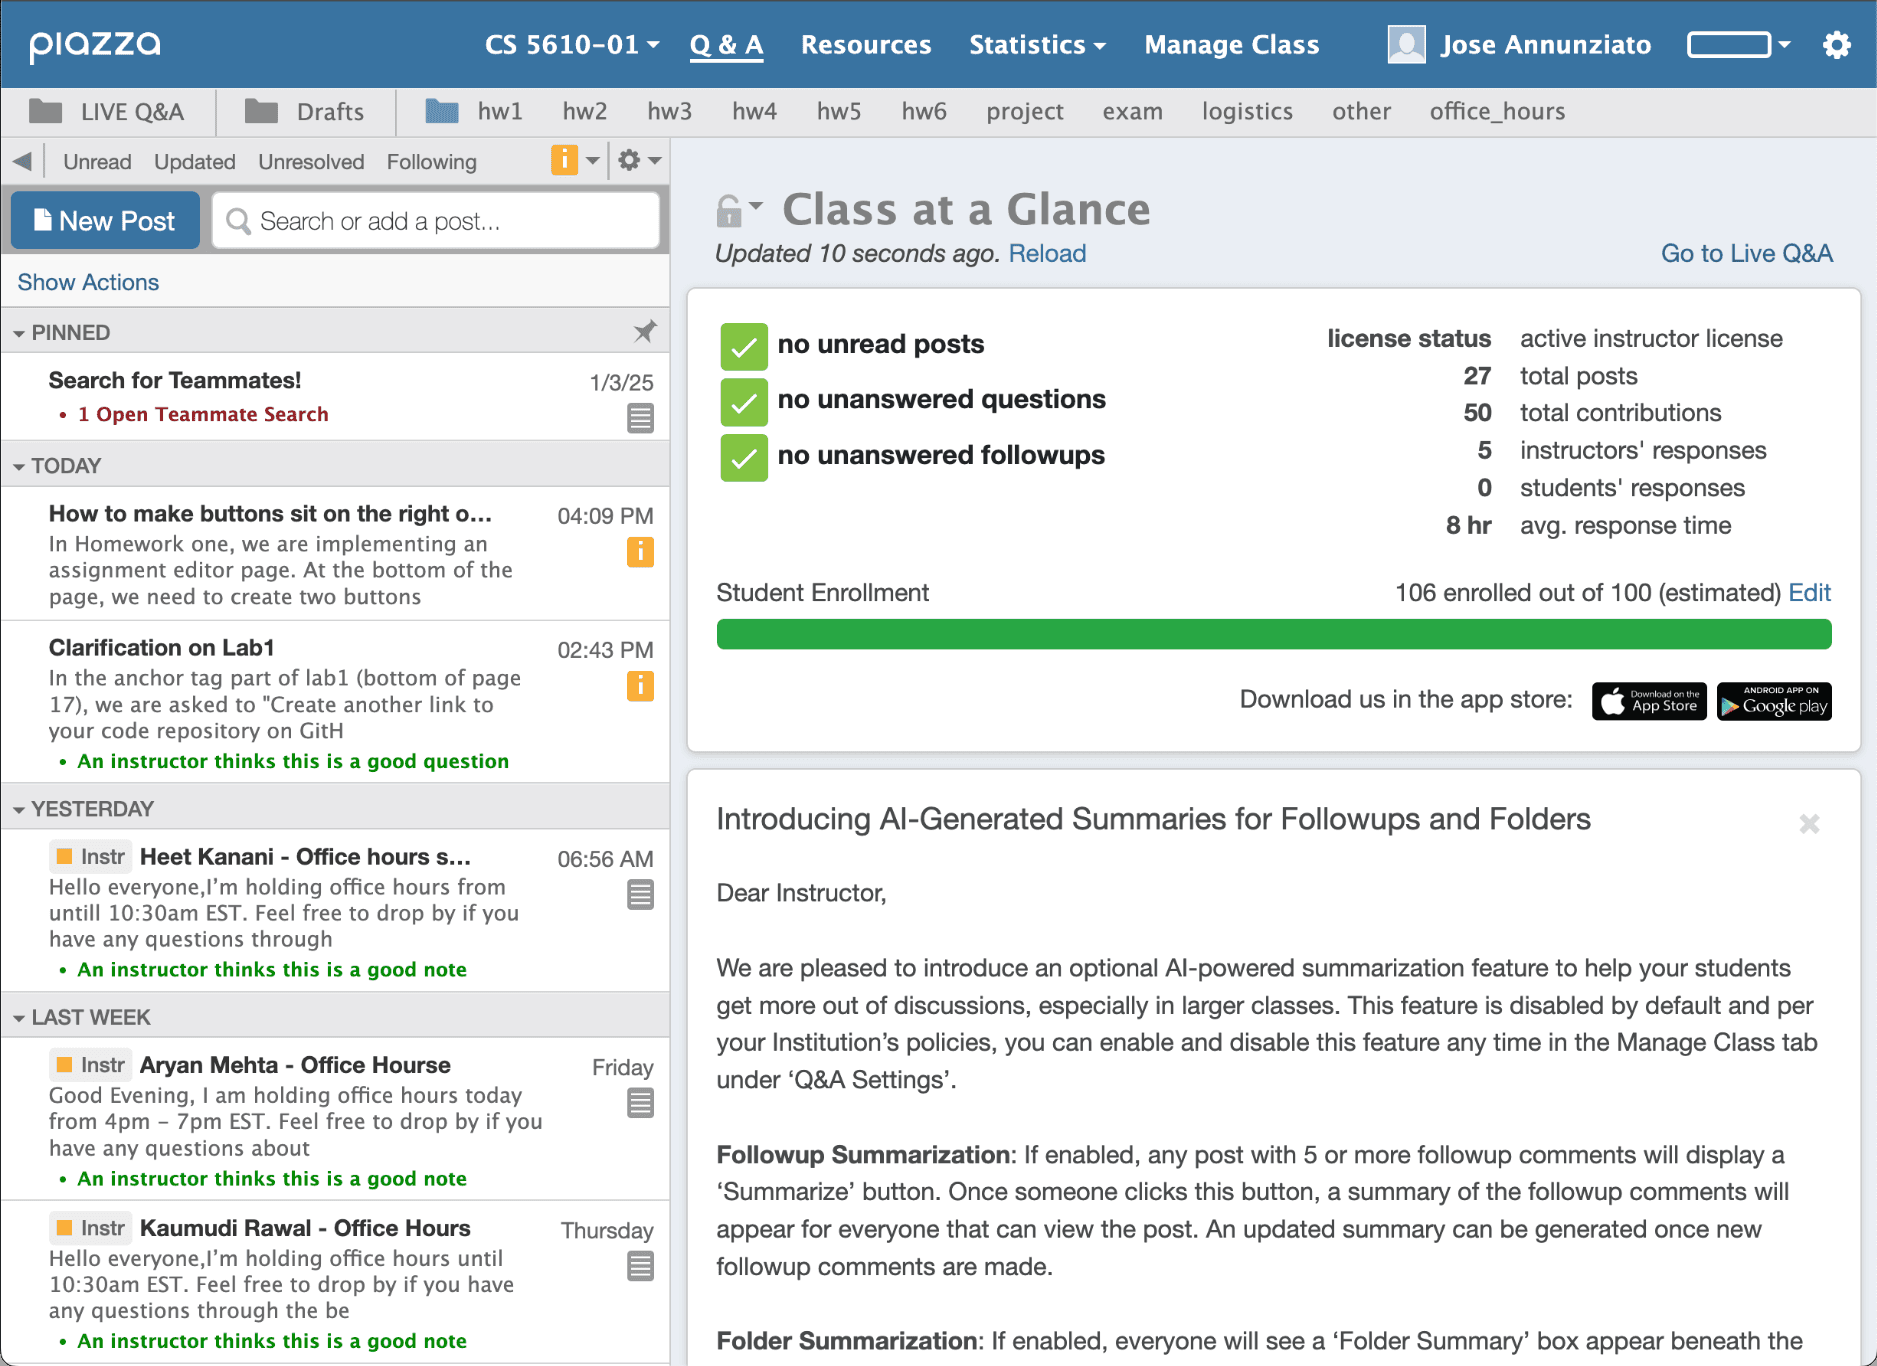
- The Q&AS has the following sections

- At the top of all screens there is a fixed Pazza Navigation Bar (PNB) that does not scroll with the rest of the content, is shown at all times, and has the following elements
- Application Logo (AL) on the left (pazza)
- Course Name (CN) showing the name (or course number) of the current course selected in the Kambaz Dashboard (KD)
- Each course has its own instance of Pazza, e.g., selecting a different course in the Kambaz Dashboard (KD) would show a different set of questions, answers, users, folders, etc.
- Ignore the chevron to the right of the course name (the small triangle next to the course number)
- After the CN, there the following tabs that highlight when the corresponding screen is displayed, e.g., underlined, bolded or different colors
- Q&A to navigate to Q&AS described in this section and is the default screen when Pazza is clicked
- Resources not required
- Statistics not required
- Manage Class to navigate to the Manage Class Screen (MCS) described later in this document
- Jose Annunziato shows me as the currently logged in user. Display the name of the actual current logged in user
- Pazza behaves differently based on the currently logged in user, e.g., users's role such as instructors or student allow doing certain things, the posts that are visible are based on who is logged in
- Ignore the rest of the options in the navigation bar

- At the top of all screens there is a fixed Pazza Navigation Bar (PNB) that does not scroll with the rest of the content, is shown at all times, and has the following elements
- Below the Pazza Navigation Bar (PNB), there's another fixed Folder Filters (FF) listing various folders and buttons to filter the questions, notes, and answers posted by students and instructors
- Live Q&A not required
- Drafts not required
- hw1, hw2, ..., office_hours allow filtering posts by the folder they were created in
- Users can select only one folder at a time
- Posts listed in the List of Posts are filtered by the selected filter
- The selected folder is highlighted, e.g., underlined, bolded, or different color
- Below the Folder Filters (FF), there are two columns described in the following section
- On the left of the Q&AS, there's the List of Posts Sidebar (LOPS) shown here on the right
- On the right of the Q&AS, there's the Post Screen (PS)
List of Posts Sidebar
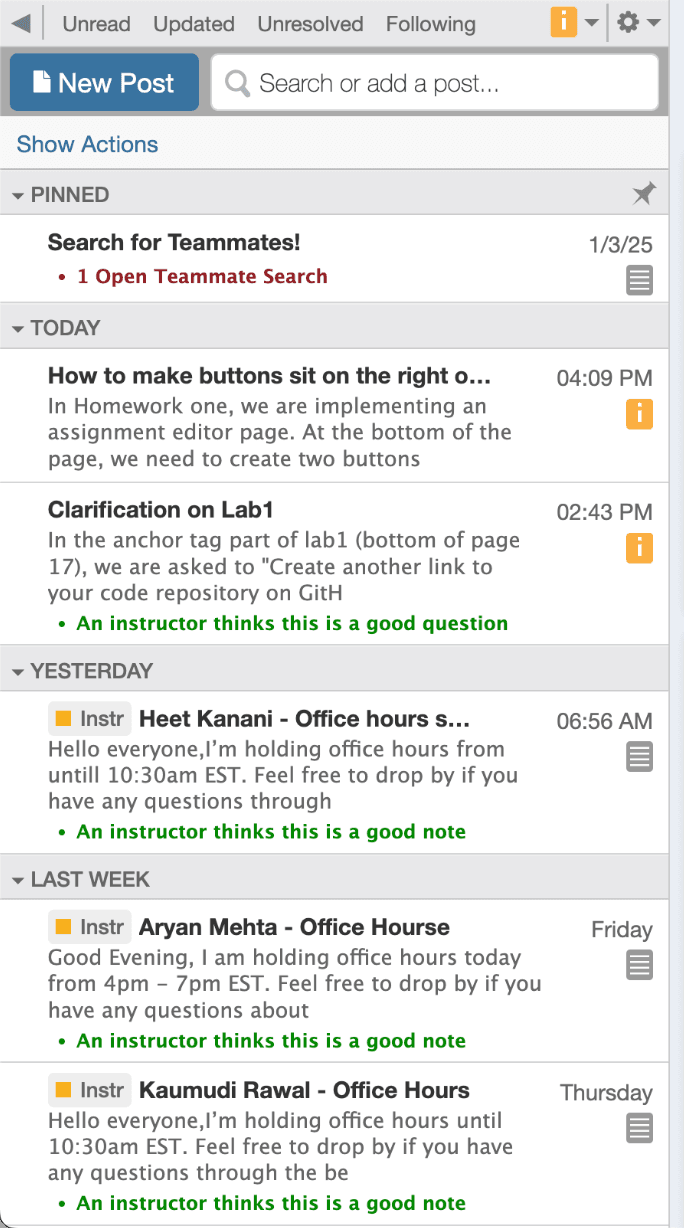
On the left of the Q&AS, there's the List of Posts Sidebar (LOPS) shown here on the right
- At the top of the LOPS there's a set of List of Posts Controls (LOPC) including Unread, Updated, Unresolved, and Following. These are not required
- To the left of Unread there's the Toggle List of Posts Sidebar button (TLOPS) represented as a triangle pointing to the left, and this button IS required
- Clicking the TLOPS hides and shows the List of Posts Sidebar
- When the LOPS is hidden, the TLOPS triangle points to the right
- When the LOPS is shown, the TLOPS triangle points to the left
- Below the LOPC, there's a New Post Button (NPB) and the Search Posts Field (SPF)
- Click on NPB to reveal New Post Screen (NPS), described later in this document
- Type in the SPF to filter posts listed in the List of Posts (LOP) based on the text in the SPF
- Show Actions is not required
- Below the NPB and SPF there's the List of Posts (LOP)
- The LOP lists posts visible by the currently logged in user
- Posts are listed in reverse chronological order with newer posts at the top of the list and older posts at the bottom of the list
- Posts display
- The title or summary in bold
- Whether the post was created by a student or instructor
- The text of the first 1 to 4 lines of the post
- The time the post was created
- Not required:
- An icon if the post is a note and another icon if the post is a question
- The message on whether the post is good or not
- Posts are grouped in a category accordion that hide or show the group of posts when clicked
- Pinned is not required
- Today lists the posts created today
- Yesterday lists the posts created yesterday
- Last Week lists the posts created last week
- Additional category accordions list posts grouped by what week they were posted in
- The name of the category should be Monday's Date of Week - Sunday's Date of Week, e.g., if a week starts on Monday January 7, then the name of the category would be 1/7 - 1/13
- You are free to make Sunday the first day of the week
- The year is optional
Post Screen
On the right of the Q&AS, there's the Post Screen (PS) which is the main content and can display various screen depending on whether the user is viewing an existing post, answering a post or creating a new post. First let's discuss how users post new questions or notes.
Posting New Questions or Notes
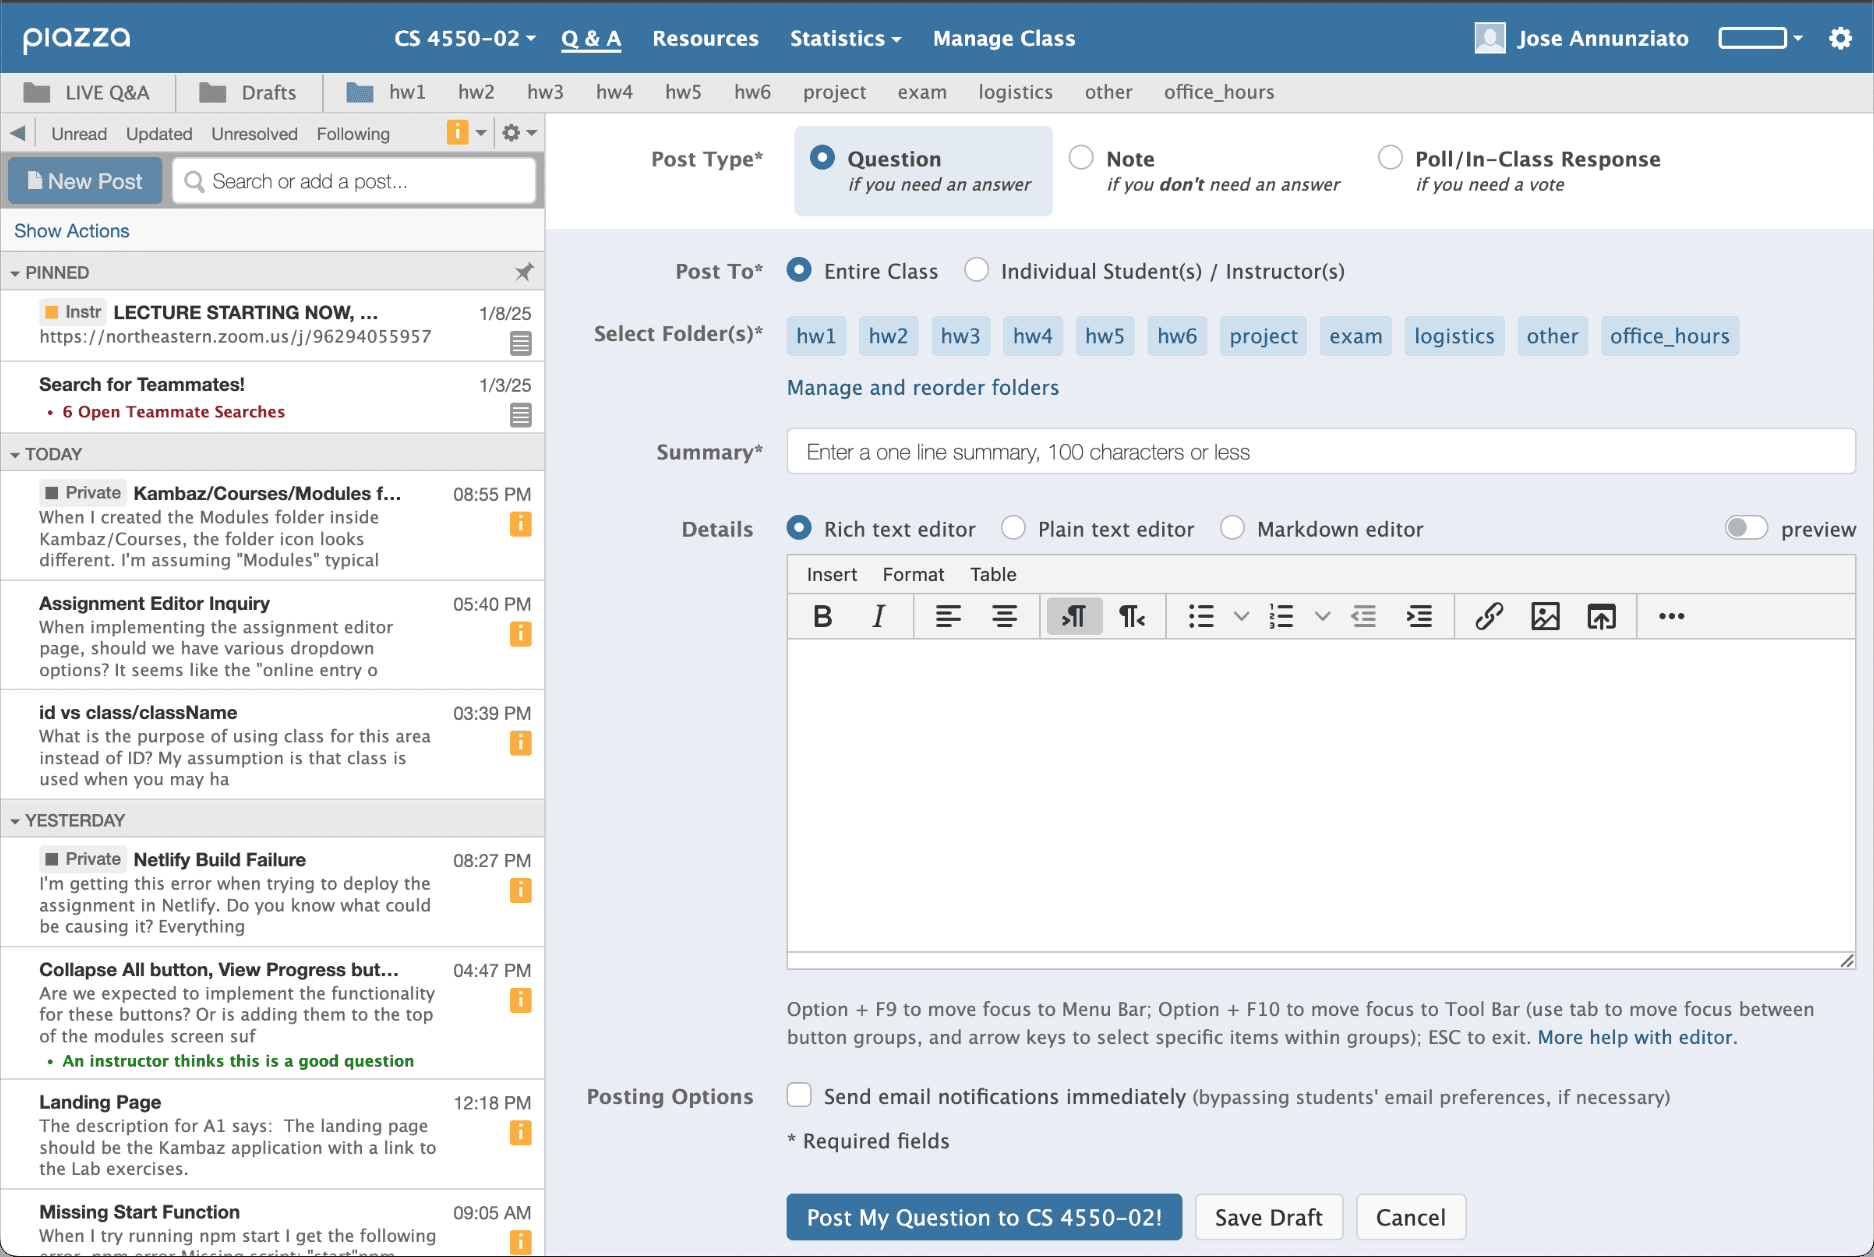
Let's now focus on the section detailing the requirements for the screen where users can post both questions and notes, an integral feature of the Pazza platform. This screen allows users to contribute their queries and insights directly related to their courses. Here's an introduction to how this functionality works: Clicking New Post in the Questions and Answers Screen (Q&AS) will display the New Post Screen (NPS), where the process of creating and categorizing a post begins. At the top of this screen, you'll find three Post Type Tabs (PTT) that let you specify whether your post is a Question, a Note, or a Poll/In-Class Response, although the latter is not required for this implementation. Here's a detailed look at the requirements for this screen:
- Clicking New Post in the Questions & Answers Screen (Q&AS) displays the New Post Screen (NPS) as shown above

- At the top of the NPS there are three Post Type Tabs (PTT)
- Question selects the type of this post as a Question (selected by default)
- Note selects the type of this post as a Note

- Poll/In-Class Response is not required
- Below the PTT, authors can select who to Post To (PT)
- Entire Class selects that the post will be visible to everyone in the class (selected by default)
- Individual Students/Instructors selects that the post will only be visible to selected users
- A user selection control appears allowing selecting which users can see the post
- The first option is Instructors
- The rest of the options are all users in the course including all students and instructors
- You can select any number of users
- Only users selected will be see the post in their LOP

- No screen shot is provided, so you are free to implement as you wish
- Below the PT, you can Select Folders (SF)
- Displaying the Folder(s) this post belongs to
- The list of folders can be edited as described in the Manage Class later in this document
- You can select as many folders as you like
- At least one folder is required
- In the Q&AS, users can filter the posts in their LOP by clicking the Folders

- Clicking Manage and reorder folders navigates to Manage Folders described later in this document
- Below the SF, authors type a Summary of the question
- Serves as title and a quick one line short description of the Question or Note
- Maximum 100 characters
- Summary is required
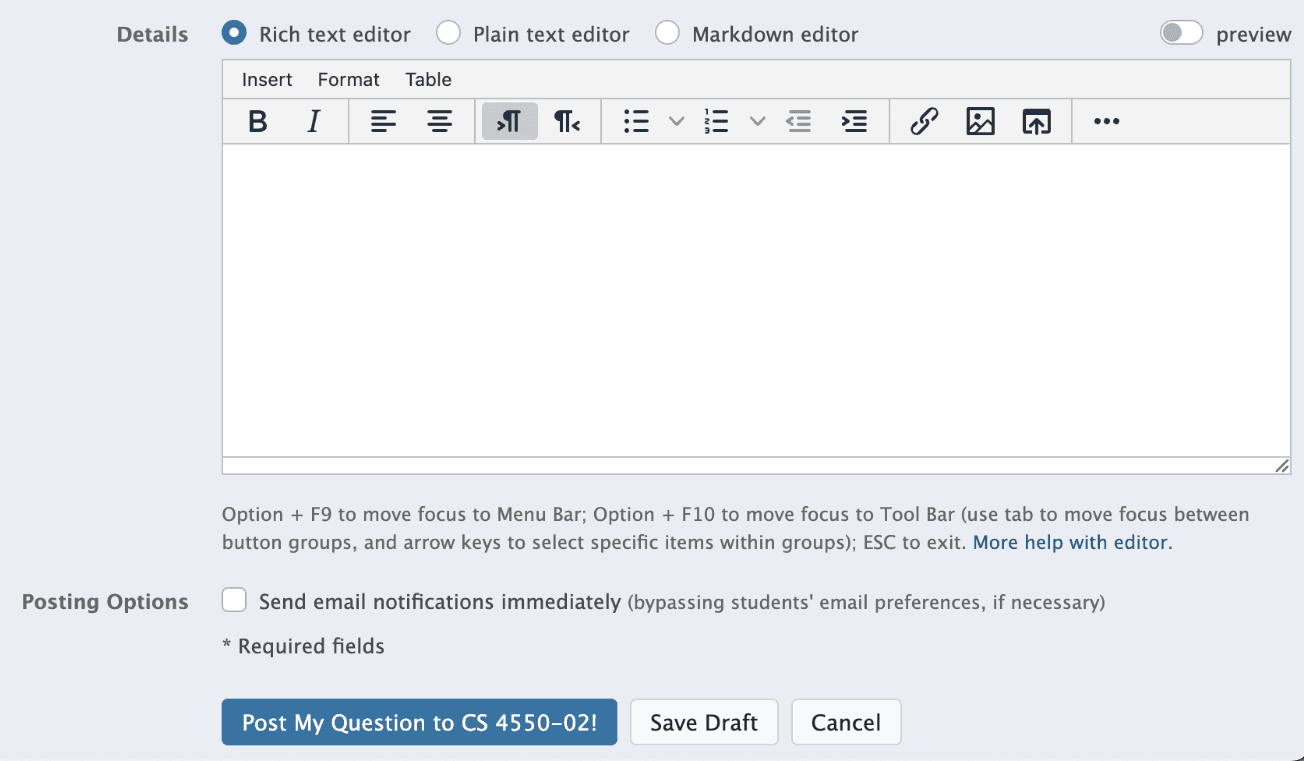
- Below the Summary, authors can type the Details of their Question or Note
- Only support Rich Text Editor (RTE). Search for, install, and use an existing RTE React component
- Details is required
- Ignore Plain Text Editor, Markdown Editor, and preview
- Below the Details ignore Posting Options
- It is not required that posts be emailed to users
- Posts can be viewed by coming to Pazza
- Users click on Post My Question or Post My Note to create the post
- Save Draft is not required
- Cancel discards the post, closes the Post Screen (PS) and returns to the Class at a Glance Screen (CGS) described later in this document
- If required fields are missing, show an appropriate alert, dialog or message below each required field
- If no errors
- Creates new Question or Note
- Shows new post in LOP
- Highlights new post
- Shows new post on the right side as described in the next section
Viewing and Replying to Posts
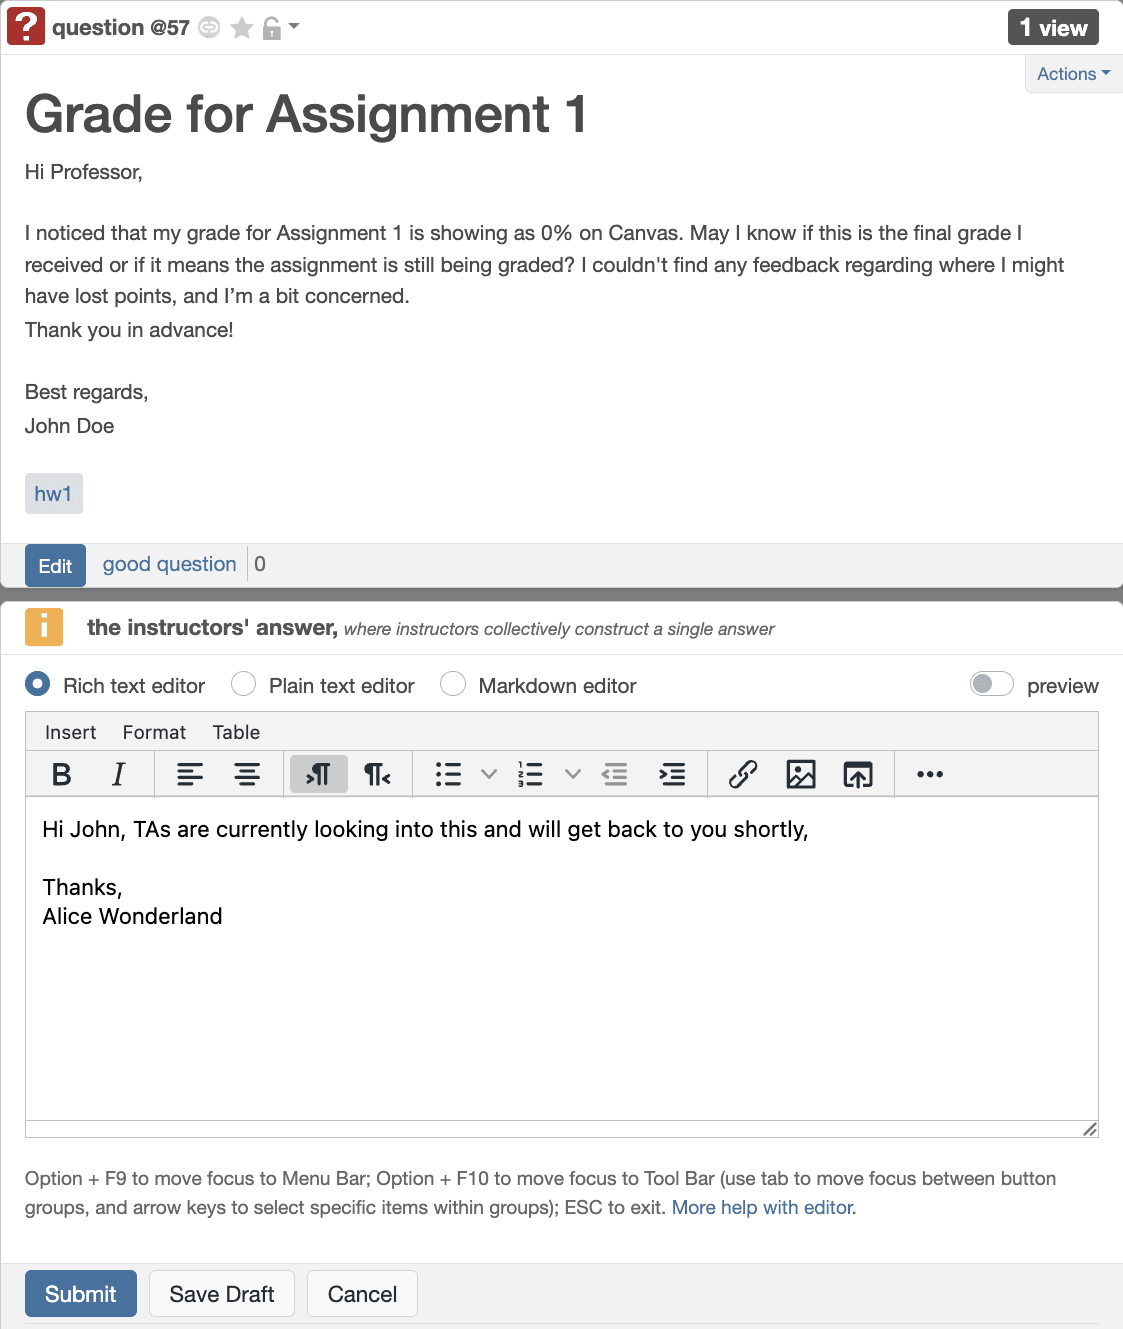
Now, let's explore the requirements for the screen where users can view and post answers to questions within the Pazza platform. This screen allows instructors and students to provide responses to queries posted by other students. Upon clicking a post in the List of Posts (LOP), it is displayed in the Post Screen (PS) as shown in the provided screenshot. Here, the original question is prominently displayed at the top of the PS, with its summary highlighted as a bold header for easy reference. Below is a detailed list of requirements that define how this screen should function, ensuring a seamless and effective interaction for answering questions. If a post is selected, or a user clicks on a post to select it in the List of Posts (LOP), then on the right hand side
- The post is displayed in the PS as shown here on the right
- The current post is highlighted in the LOP
- All posts displayed in the PS display the following
- How many have viewed the posts
- The folder the post was created in
- Who created the post
- Edit button that allow instructors and the author of the post to edit the post
- Actions dropdown only visible to instructors and author to Edit or Delete the post
- Not required:
- Anonymous posting is not allowed/required
- Time past since last modified
- Follow/Stop following
- Good Question/Good Answer
- If the post is a Question (instead of a Note)
- Below the post, in a section labeled Student's Answers, display all answers from students (if any) including
- Author of the answer
- Timestamp of the answer
- Edit button for instructors and author to edit the answer
- Action dropdown allowing instructors and author to Edit or Delete the answer
- If the question has not been answered, and the current user is a student, then the student can post an answer in a WYSIWYG editor
- Below the student answers (if any), in a section labeled Instructor's Answers, display answers from instructors (if any) including
- Author of the answer
- Timestamp of the answer
- Edit button for instructors to edit the answer
- Action dropdown allowing instructors to Edit or Delete the answer
- If the question has not been answered, and the current user is an instructor, then the instructor can post an answer in a WYSIWYG editor
- Below the post, in a section labeled Student's Answers, display all answers from students (if any) including
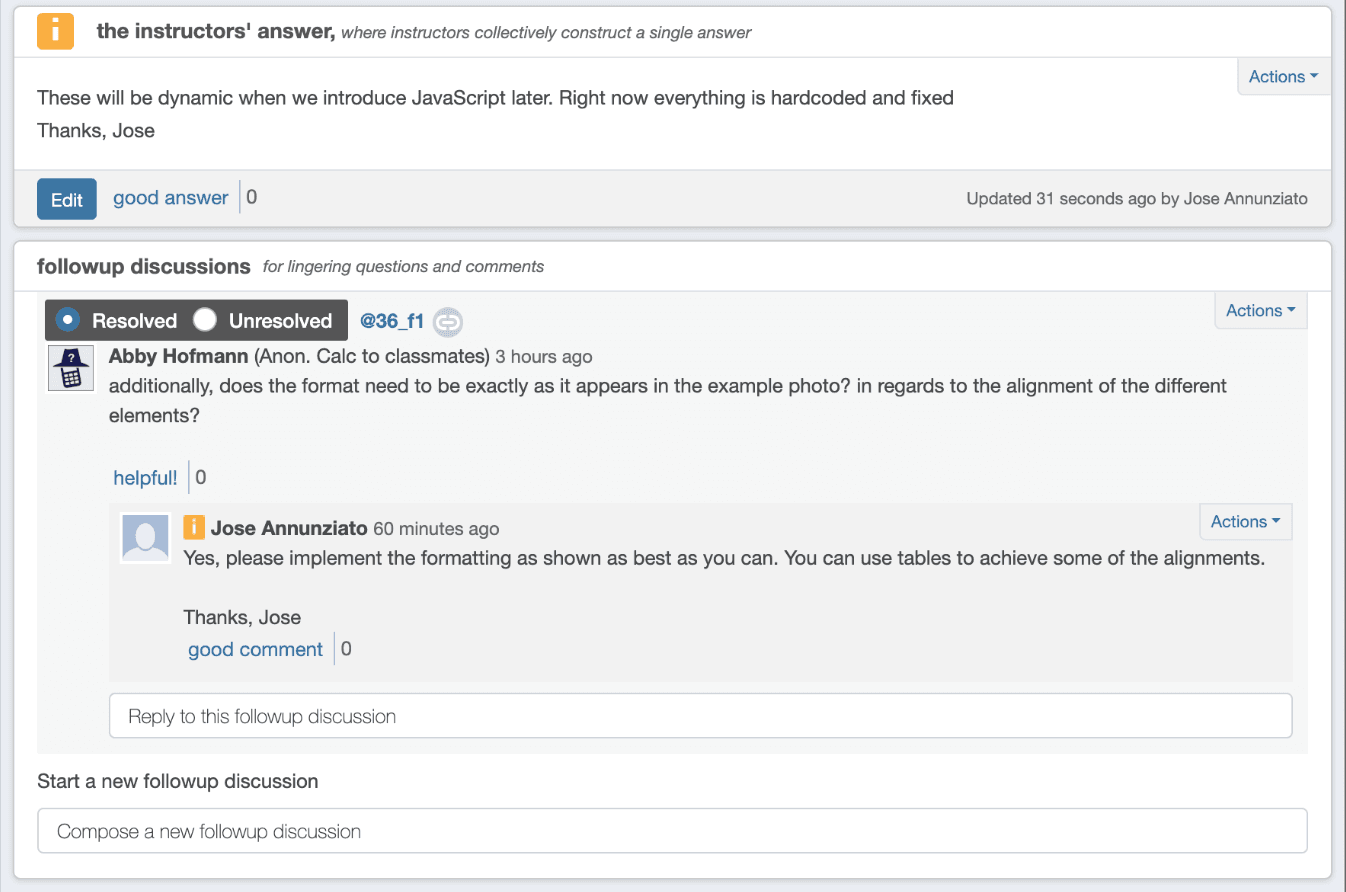
- Follow up Discussion (FUD)
- Under the answers (if any), FUD allows participants to enter a discussions with nested replies as shown here on the right
- Start a new followup discussion field or textarea to start a new discussion
- All discussions have
- Resolved and Unresolved buttons to toggle on whether the discussion has been resolved
- Author of the discussion
- Timestamp of when the discussion started
- The text of the discussion
- Action dropdown allowing instructors and author to Edit or Delete the discussion
- Helpful is not required
- A Reply field or textarea allowing to reply to the discussion
- Replies that contain
- Author of the reply
- Timestamp of the reply
- Text of the reply
- Action dropdown allowing instructors and author to Edit or Delete the reply
- Good comment is not required
- A Reply field or textarea allowing to reply to the reply
Class at a Glance Screen
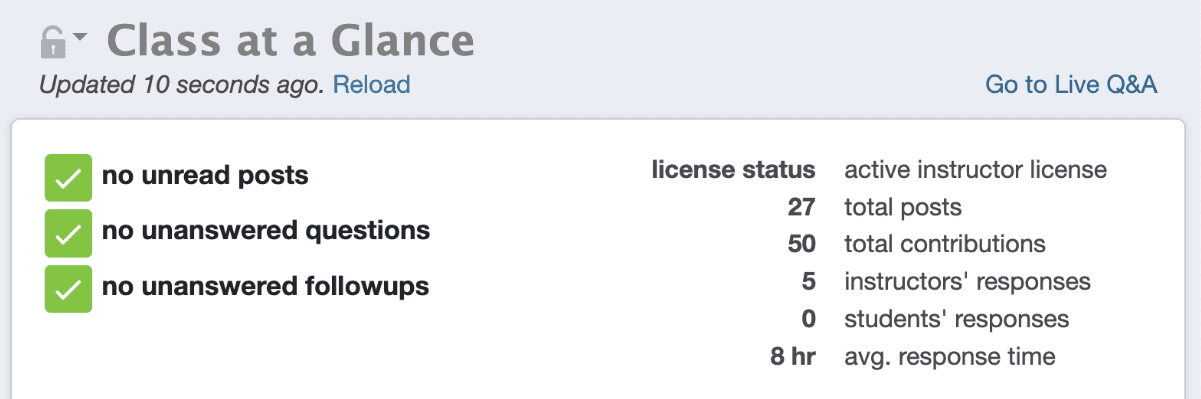
If no post is selected the PS displays Class at a Glance Screen (CGS) displaying the following meta information as shown here on the right
- Number of unread posts or no unread posts
- Number of unanswered posts or no unanswered posts
- Total number of posts
- Number of instructor responses
- Number of student responses
- Number of students enrolled
- Ignore everything else in the screen
- Not required:
- Number of unanswered followups
- Total contributions
- Average time of response time in hours

Manage Class Screen (MCS)
- Clicking Manage Class Tab (MCT) reveals the the Manage Class Screen (MCS) as shown here on the right
- Only instructors can see and click the MCT
- Only instructors can navigate to the MCS, e.g., the URL or hash to MCS is protected
- The MCS shows 7 tabs of which you must implement the following
- Manage Folders Tab (MFT)
- Clicking the MFT reveals the Manage Folder Screen (MFS) described later in this document
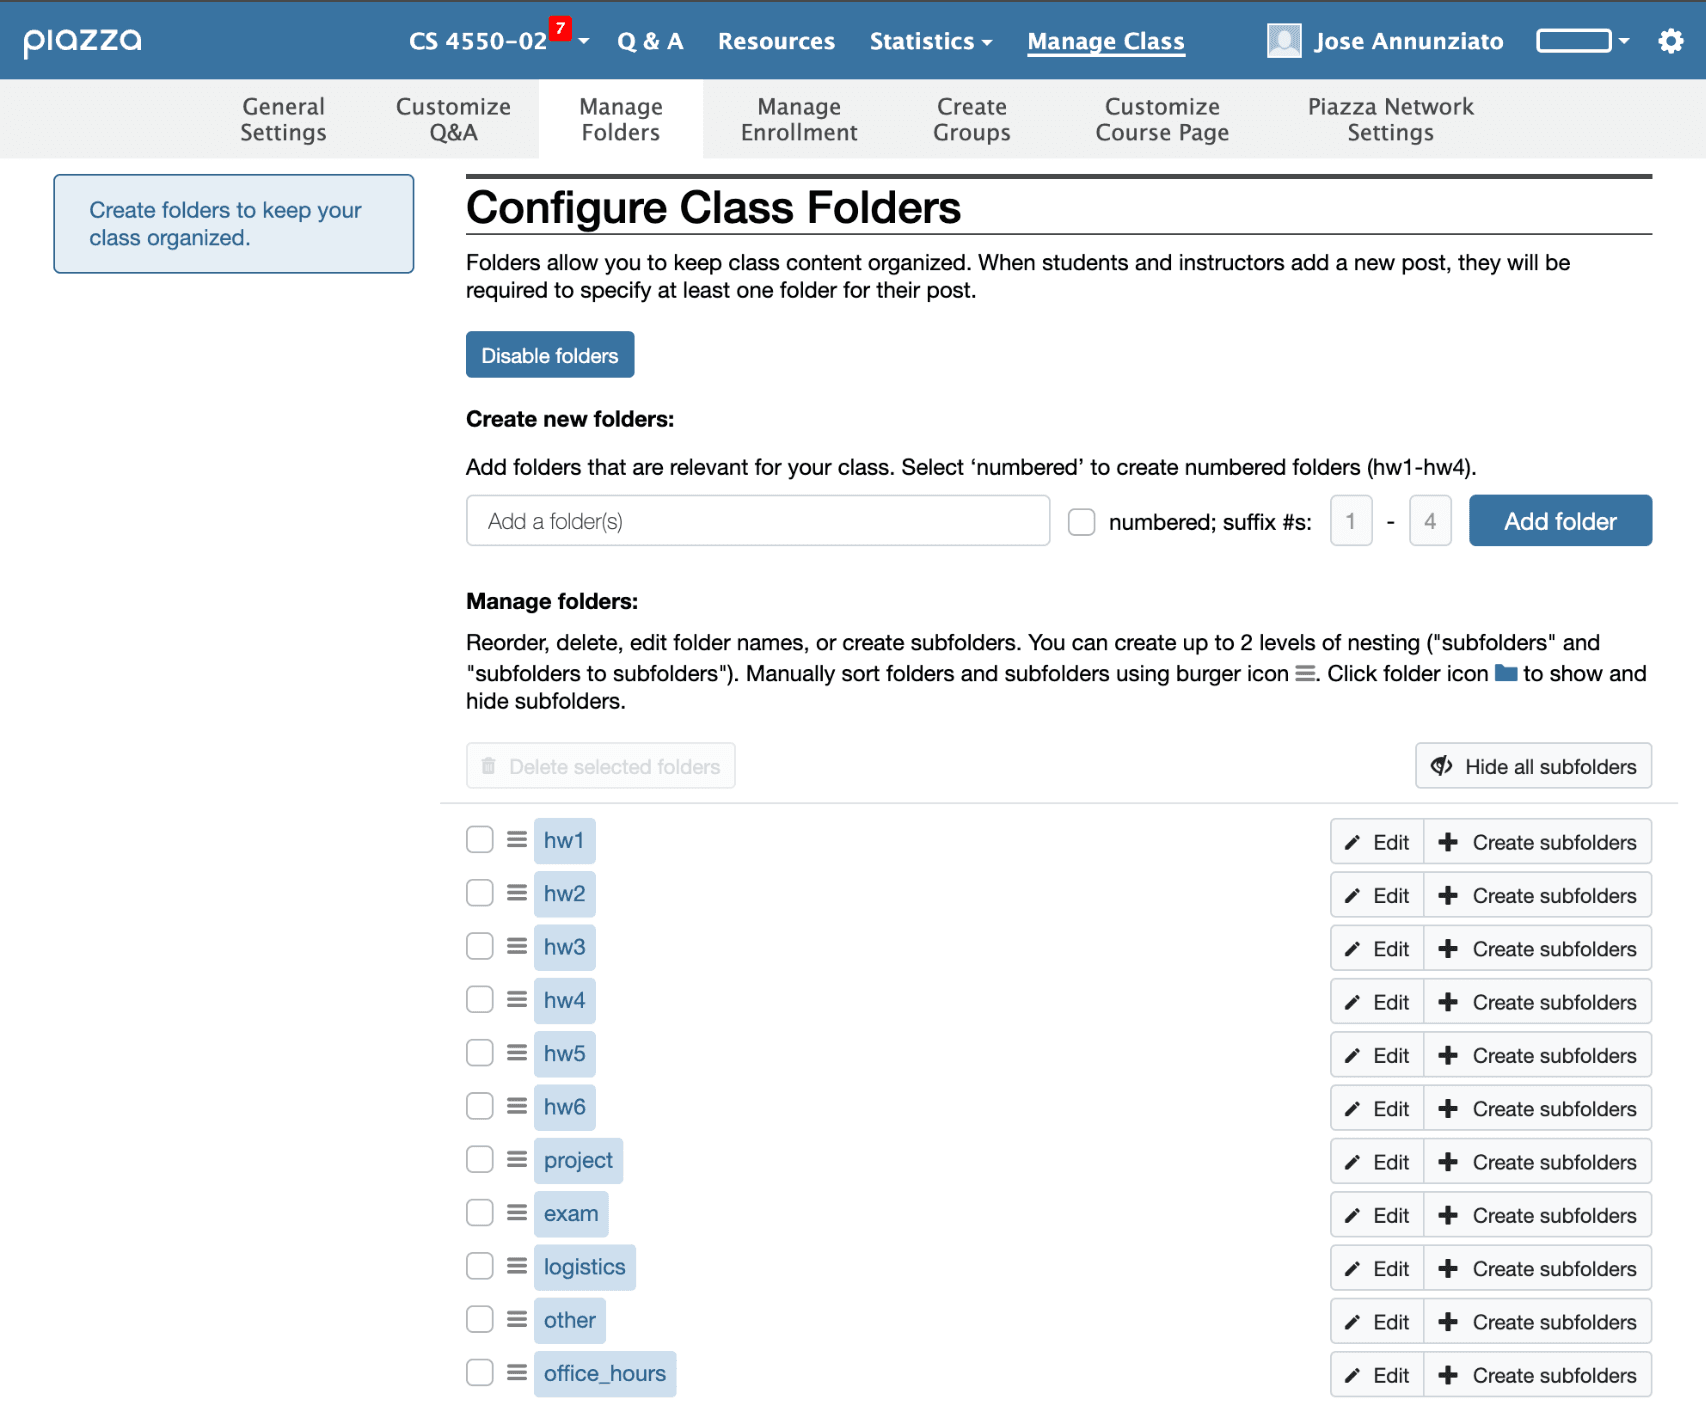
- Clicking the MFT reveals the Manage Folder Screen (MFS) described later in this document
- Manage Folders Tab (MFT)
Manage Folders Screen (MFS)
- Clicking the MFT reveals the Manage Folders Screen (MFS) as shown here on the right
- The blue description box on the left is not required
- Descriptions and other labels and text can be customized at your discretion
- The title can be one of the following
- Configure Class Folders as shown
- Manage Folders
- The default folders are as shown here on the right, e.g., hw1, hw2, hw3, ..., project, exam, logistics, other, office_hours
- To add a new folder, instructors type the name of the new folder in a field and click Add Folder
- The screenshot suggests you can add multiple folders at once, but it is not required. You are only required to be able to add one folder at a time
- The list of folders updates immediately after adding a new folder, and list persists if screen is refreshed
- To delete folders select folders to be deleted and click on Delete selected folders
- To edit the name of a folder
- Click Edit next to the folder to be edited
- Folder name is replaced by an input field
- Edit button is replaced by buttons Save, and Cancel
- Clicking Save replaces Save and Cancel buttons with Edit and input field is replaced with the new folder name
- Clicking Cancel replaces Save and Cancel buttons with Edit and input field is replaced with original folder name
- Not required:
- Disable folders
- Create subfolders
- Numbered; suffix
- Hide all subfolders
- Rearranging order of folders
General Requirements
- All fields must be clearly labeled. Use the label in the screenshots unless otherwise stated
- Additional descriptive text explaining a particular field or feature is optional
- Add placeholders on input fields and textareas as shown
- You can reuse text as provided in the screenshots or create your own
- The type of the input field must be appropriate for the type of information being requested. For example
- Input type date - used to request a date
- Input type number - used to request a numeric value
- Input type email - used to request an email
- Textarea - used to request long form text
- Single select dropdowns or radio buttons - used to request single option
- Multiple select dropdowns or check box buttons - used to request multiple options
- Look and feel does not have to match the screen shots provided, but must capture the intended feature. For instance
- Any field or feature not explicitly described in this document is not required, but feel free to implement at your discretion
- If a tab or folder or post is currently selected, they must be highlighted to signify that they are selected. This can be done by underlining the text, or bolding the text, or changing the foreground and/or background color
- All settings, selections, and data is persisted and re-rendered for user feedback, e.g., if an instructor adds folders in Manage Folders, logs out, and then logs back in, then the new folders are still there. If a student answered a question or replied to a followup, if they logout, and then log back in, if they visit the same question, they can see the answers and replies they created.
Ported from the former course Google Doc so staff can edit these requirements on the site.